-
To install a new bathroom, additional toilets, a laundry room or connect the condensate drain all without major work, SFA has the solution that meets your needs. With little work, you can simply drain all the water.

-
Saniflo offers a wide range of macerating and grinding pump systems as well as drain and condensate pumps. With Saniflo above-floor plumbing technology, you decide where your new bathroom, kitchen or laundry room goes! You are no longer limited to locations where downhill drainage or gravity evacuates waste. You don't even need to be in close proximity to the main waste pipe (soil stack). Smarter, faster, cleaner, Saniflo makes it simple!

-
Product news, installation stories, business information, find out all the latest information in this section.

-
If you have a question, want to activate your warranty or need to find an Engineer we are here to help!
-
From the invention of the first macerator 60 years ago right up the innovation happening today, find out more in this section about Saniflo and its parent company, Group SFA.

-
Save time on determining the most suitable solution for you! SFA offers you easy and reliable solutions for any job! Take a look at some of our Trade-Trusted Solutions!
Your professional tools

How to add a laundry room upstairs using the Saniswift drain pump
Blog 09/15/2022

How to add a laundry room upstairs using the Saniswift drain pump
While many older homes have laundry facilities in the basement or on the ground floor, demand is rising for laundry rooms that are on the same floor as bedrooms. Second-floor laundry rooms are a hot trend in new construction, but it’s also possible to renovate an older home and move the laundry upstairs.
Traditional plumbing might require you to locate a second-floor laundry room adjacent to — or even within — an existing bathroom to take advantage of proximity to plumbing pipes. Above-floor plumbing makes it possible to locate laundry facilities where homeowners most need them without breaking the concrete to install drainage.
Saniflo's Saniswift drain pump is an easy and affordable solution to adding a small laundry room virtually anywhere. Used to pump gray water away from a variety of fixtures in residential applications, the system is able to discharge the waste up to 14 feet vertically and/or 140 feet horizontally. This model is powerful and economical with a compact design which makes it perfect for installations anywhere you can imagine.
Keep in mind that the Saniswift must be installed by following Saniflo’s instruction manual and installation guidelines. It must also be installed in accordance with the standards CSA B45.9; ASME A112.3.4.
The Saniswift has multiple inlets and connections, and each has its own purpose. Let’s take a closer look:
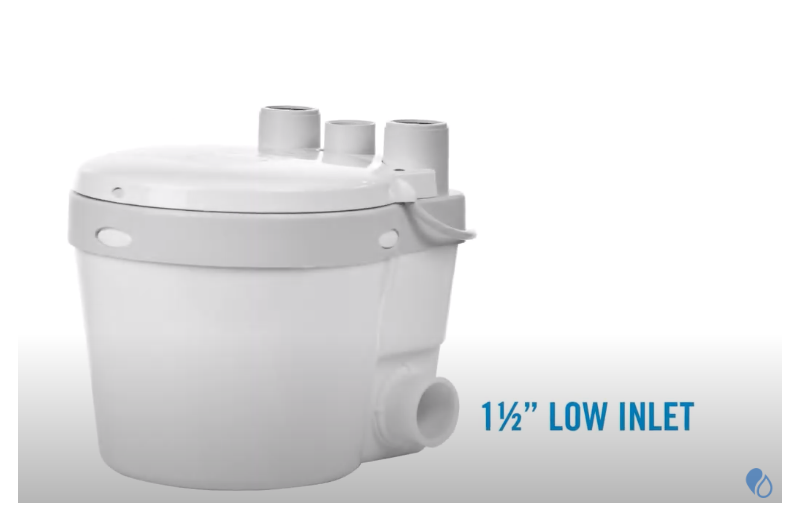
Two low side inlets: The pump has two, 1.5-inch inlets with built-in check valves on either side of the pump enclosure. Use these inlets to connect your fixtures. In addition to a laundry sink, the Saniswift will also accept and discharge the wastewater from a variety of other sanitary fixtures, such as a shower and a urinal. The Saniswift can also accept gray water from a washing machine through an indirect connection, such as a laundry sink.
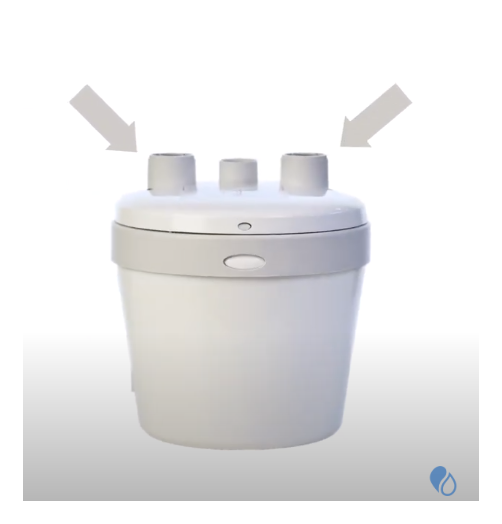
Two top inlets: The unit has two additional 1.5-inch inlets on top of the enclosure where either an additional fixture or vent pipes can be installed, using the rubber coupling provided (more on that below). If you decide not to use one of the drain inlets, a cap is provided to cover it. However, a vent pipe is required.
Discharge connection and vent port: The top of the pump includes both a vent port and a discharge connection, each measuring 1.5 inches, that can adapt to the same-diameter pipe. The unit discharges the waste coming from your fixtures through one inch or one and a half inch rigid pipes, using the discharge rubber coupling provided. The wastewater being evacuated by the pump must be discharged using a 1-, 1.25- or 1.5- inch-diameter copper or plastic (PVC, CPVC) pipe.
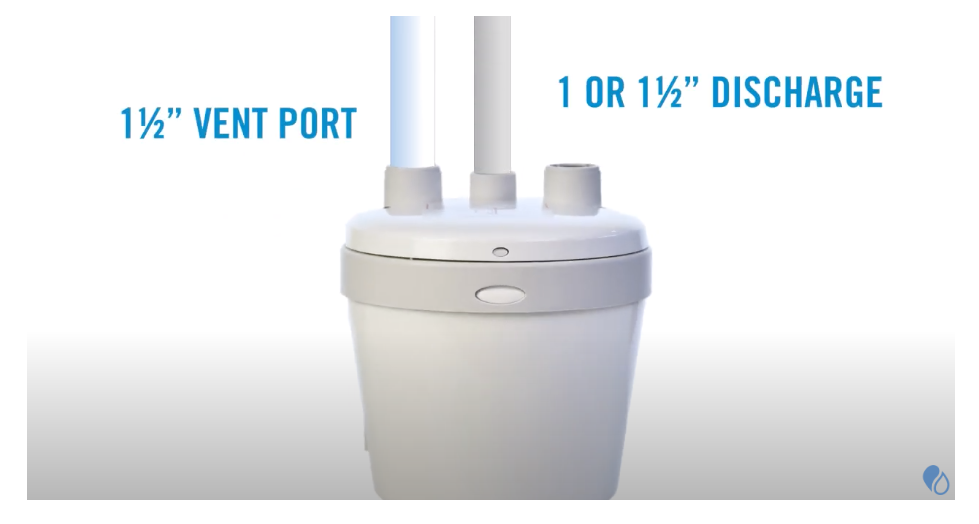
The discharge rubber coupling provided has a built-in non-return valve that prevents wastewater from re-entering the pump through the coupling once the system is turned off.
Now that you’ve learned more about the Saniswift drain pump, you’re ready for installation. But before you get started, always follow the ten golden rules for Saniflo installation.
Ten golden rules for Saniflo installations:
Rule #1: All discharge pipework should be copper, PVC, or CPVC capable of handling the pressure exiting the pump. Users should install a ball valve for shut-off and easy removal. Installers must support the surface of the system and pipes across the length of the discharge run.
Rule #2: The first horizontal run cannot exceed 24 inches before the first vertical run. At the end of the vertical lift and after turning horizontally, the discharge pipe should be sloped one-quarter inch per foot until framed into the main sewer line. It’s important to ensure the discharge goes into the septic tank or the main sewer and not into an open drain.
Rule #3: Bends should be smooth with a long radius, not tight elbows. Use long sweeping 90-degree elbows or two 45-degree elbows back-to-back.
Rule #4: When installing multiple systems, each discharge pipe should run separately into the main sewer or connection through the top using a wye fitting to prevent backflow.
Rule #5: A shower and or bathtub should be raised off the floor by six inches for macerator systems and drain pumps; and eight inches for grinder systems. The pipe draining into the pump should have a minimum of a quarter-inch per foot gravity fall.
Rule #6: When pumping directly downwards more than nine feet, users must install anti-siphon valves at the highest point of the discharge line to eliminate siphonage in the pipe. Otherwise, the diameter of the downward pipe must be increased.
Rule #7: If the unit is positioned behind a wall, install an access point as close as possible to ensure easy maintenance and servicing of pipes, water valve, GFCI plug, and pump.
Rule #8: Ensure that air flows freely in both directions for proper venting. Do not use one-way mechanical or Studor fans, as these restrict airflow.
Rule #9: Insulate the pipes if exposed to freezing conditions, and empty the units to avoid extreme cold or frost damage, particularly during the winter. Installers can also use plumber’s antifreeze to help insulate during the colder months.
Rule #10: The unit comes with a three-prong plug which users should connect to a 110-volt electrical outlet. For safety reasons, we recommend using a GFCI plug.
Check out this video to see the 10 Golden Rules for Installing Saniflo in application.
When it comes to installing a laundry room upstairs, the Saniswift can provide relief for homeowners with its effective installation features. Saniswift’s multiple inlets and connections allow installers to conveniently place the product wherever the homeowner chooses to. By following Saniflo’s guide for installing Saniflo products, users can feel confident that their new system will provide stability without breaking the floor or the bank.
Do you have questions about adding a bathroom, sink or laundry room to your latest project? Email [email protected] with details about your installation to learn which products would best meet your residential or commercial needs!